Tag: Visual Studio

Using Libman – The New Visual Studio Library Manager

Libman or “Library Manager” is a new tool built into Visual Studio 2017 (version 15.8+) for managing simple client side dependencies. For example, if you just want to create a simple ASP.NET Core MVC web application with Bootstrap 4, you can quickly and easily pull in just the CSS and JavaScript files you need, and you can put them where you want them. Unlike the old days when we pulled in client side packages using the NuGet Package Manager and the package maker decided where the files went and you just had to deal with it (or deal with the consequences of moving them) or today when using NPM where everything goes into the node_modules folder, with Libman you get to choose where the files go in your project. Not only can you choose where the files go, but you can choose exactly the files you want and ignore the rest if you don’t need them in your project. Obviously there are still plenty of scenarios where NPM fits the bill perfectly, but for the projects where you just want to manage a few of small dependencies and you want to keep it “lean and mean”, Libman may just be the right choice.

Managing Libraries Using the GUI

You can add/manage files with the Library Manager in a couple of different ways.

The first way is through the dialog which can be invoked by right clicking on a folder in the solution and selecting “Add..” and then “Client Side Library…” from the context menu. As an example, lets say we want to update all of our libraries in the lib folder @ -/wwwroot/lib to be managed by Libman. (You’ll want to clean out the folder first if you are going to use Libman to manage all of your libraries.)

  • Right click on the lib folder in -/wwwroot and select “Add..” and then “Client Side Library…”
  • A dialog will open allowing you to select the library you would like to pull in.
    • Choose a provider (More on this in a bit, we’ll leave it on cdnjs for now)
    • Start typing the name of the library (jQuery in this case), you’ll get intellisense to help you find the packages available.
      • Be sure to use tab to complete the library selection. This will fill in the version and populate the files list.
      • You can also type jquery@ and you’ll get an auto complete list of all the available versions.
  • I usually select “Choose specific files” and select the files I want in my project specifically.
  • “Target Location” will be populated automatically from the location you right clicked on in your project and the name of the library you chose, but you can customize it if you like.
  • And finally, just click install to add the file(s) to you project.

The first time you do this a libman.json file will be created in the root of your project. This acts a lot like the old package.config for NuGet packages in .NET Framework applications in that it keeps track of the relevant settings for Libman and lists all of the libraries being managed by Libman.

In order to replace all of the original libraries you’ll need to do this for each library and update the references to the individual items in the ~/Views/Shared/_Layout.cshtml and the ~/Views/Shared/_ValidationScriptsPartial.cshtml files. (The original libraries and version are jquery@3.3.1, jquery-validate@1.17.0, jquery-validation-unobtrusive@3.2.9, and twitter-bootstrap@3.3.7 .)

Managing Libraries Manually

The second way you can manage libraries is by right clicking the project and selecting “Manage Client-Side Libraries …”. This will open up the libman.json file at the root of your project to be edited. (If libman.json does not exist, one will be created for you.) Here’s an example of a new empty file:

{
  "version": "1.0", 
  "defaultProvider": "cdnjs",
  "libraries": []
} 

To add your first library to this file manually expand the brackets [] after libraries (libraries is an array) and start a new object with braces {}. Inside the braces add four new elements:

  • “provider” – the value for this should be one of the following:
    • “cdnjs” – use cdnjs.com as your provider.
    • “unpkg” – use unpkg.com as your provider.
    • “filesystem” – use your local file system.
  • “location” – The path from the root of your project to put the library files into.
  • “library” – The name of the library
  • “files” – A Json array of file names.

Here’s what it might look like with cdnjs as the provider, the same location we used above (-/wwwroot/lib) for jquery 3.3.1.

{
  "version": "1.0", 
  "defaultProvider": "cdnjs", 
  "libraries": [ 
    {
      "provider": "cdnjs", 
      "destination": "wwwroot/lib/jquery", 
      "library": "jquery@3.3.1", 
      "files": [ 
        "jquery.js", 
        "jquery.min.js", 
        "jquery.min.map"
      ]
    }
  ]
} 

Microsoft has provided a nice editor experience for this file inside Visual Studio. You get autocomplete for just about everything including the library names and file names. If you set the insertion point inside of a library object a light bulb will show up in the margin you can click on or you can use ctrl-. to activate a menu of options to update or uninstall that library. Also notice line 3 “defaultProvider : “cdnjs”? This means that if you omit the provider in a given library then “cdnjs” will be the provider by default. You can also add a line “defaultLocation” : “my/default/path” which will allow you to omit the location in each of the library objects.

Summary

When I read the initial blog post about this new feature there was no GUI at all, just the Json file. At first I wasn’t a fan, but after trying it out and seeing the autocomplete work it began to grow on me. Now I still use the Json editor even with the GUI being available. It’s a simple, but useful tool that does exactly what is needed and nothing more (and I can finally control where my client side dependencies get installed).

Resources

Windows 8 Consumer Preview Released

If you hadn’t heard, Windows 8 Consumer Preview was released this morning (you can get it at http://preview.windows.com/).  So far I have installed it on both the Build Developer Tablet and in a Virtual Machine (VMware Player) and both installs were relatively quick and painless.

So far it seems stable (5 hours in LOL).  It seems to be coming together fairly nicely.  Once I have had some time to work with it a bit, I’ll post something a bit more substantial.  For now here is some screen shots. 

The Lock Screen

LockScreen

The Start Screen

StartScreen

Notice you can now choose from a few color schemes and texture patterns for the Start Screen.  Also you can now group items.


The App Store

Store


Included Apps

Weather

Weather


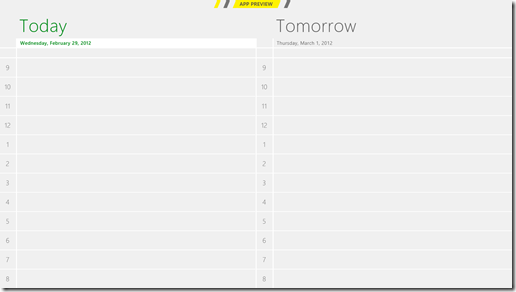
Calendar

Calendar

Calendar.Day


Maps

Maps

Maps.Traffic


Solitaire (of course)

Solitaire


Visual Studio 11 Beta on Windows 8

Microsoft also released the Beta version of Visual Studio 11 this morning.  Here’s a quick shot of the new Dark Theme.

VisualStudio.11

You can download the Visual Studio 11 Beta from http://www.microsoft.com/visualstudio/11/en-us

The communication object, System.ServiceModel.Channels.ServiceChannel, cannot be used for communication because it is in the Faulted state.

Today was the first time I have worked on our Azure application in quite a while, so I was unpleasantly surprised when I got the latest version of the code, clicked run and was greeted with :

The communication object, System.ServiceModel.Channels.ServiceChannel, cannot be used for communication because it is in the Faulted state.

CommunicationObjectFaultedException

After a lot of poking around and reinstalling the SDK I finally found the solution.  Apparently when running an application under Azure SDK version 1.3 the development environment needs to modify the web config in some way.  However, since I am using TFS for source control, the file was marked readonly and could not be edited.

The work around seemed pretty simple, just remove the readonly flag and off we go.  The next problem is that every time you get latest from source control the file gets marked readonly again and now it won’t run. 🙁  To get around this just add a post-build command to your project to automatically remove the readonly flag when you run your project.   To do this right-click on your project in the Solution Explorer and select properties.  Go to the Build Events tab and enter the command : attrib -r “$(ProjectDir)Web.Config” .

attrib -r "$(ProjectDir)Web.Config"

The Build Wrap Up

Unfortunately, as is often the case at a large developer conference, the Internet connection gave out on Friday morning and I was unable to make my post for Thursday’s sessions.  I attended a couple of more sessions Friday and left directly from the conference for the airport and didn’t arrive home until after 2am Saturday.  Now that I am back home and settled in, Let’s just do a wrap up of the conference.

On Thursday & Friday I attended a few really good sessions, specifically “Future Directions for C# and Visual Basic” presented by Anders Hejlsberg, “Creating immersive data experiences with Entity Framework” presented by David Annsley-DeWinter & Jeff Derstadt, and “Building real-time web apps with HTML5 WebSockets” presented by Ravi Rao.

Of the Sessions I attended I would recommend watching the following if you missed them:

One of the sessions I was looking forward to on Thursday was cancelled (Building IIS and ASP.NET apps with the power of async – Damian Edwards and Phil Haack).  I believe they are planning on recording the session once back in Redmond, so I’ll post a link when I see the video.

Windows 8 Developer Preview

If you were not lucky enough to attend Build and receive a Window 8 Developer Preview PC you can download the Windows 8 Developer Preview from http://msdn.microsoft.com/en-us/windows/apps/br229516.  Scott Hanselman has a good article on how to set up a Windows 7 PC to boot from Virtual Disk.  I have followed this guide and installed The preview on the PDC09 Laptop. It seems to work well so far.

Beta & technical preview downloads – Announced this week

Executive Conference Summary – Key Take Aways

The conference really revolved around the Release of Windows 8 Developer Preview and Building Apps for the new Metro Interface.

Microsoft has put significant effort into improving performance of the operating system for Windows 8.  Boot times seem to be much quicker, the UI seems very responsive and the memory footprint for the O/S has been cut nearly in half.

Windows 8 will ship with a new Windows App Store for Metro Apps.

The new Metro Interface looks a lot like the Windows Phone 7 Metro Interface.  When writing an application for Windows going forward you will have the choice of building a traditional Win32 (or .Net WinForms/WPF) app running on the desktop or a new Metro Style app running on the new WinRT (Windows Run Time).  The two environments cannot be mixed, the new Metro Style apps are sandboxed.  Also note that you cannot use GDI in Metro Style Apps, only Direct X.

As a web developer I spent most of my time attending the ASP.Net and Visual Studio 11 sessions, but there were a lot of great sessions on a whole range of topics around developing for Windows 8.  I would recommend checking out Channel9 on MSDN to learn more and watch the sessions.

In ASP.Net 4.5 Web Forms gets support for Model Binding,  Strongly Typed Data Controls, Support for Data Annotations.  All ASP.Net applications get better support for HTML 5 and CSS3, CSS Folding, auto tag matching, new improved design view support (borrowed from Expression Blend as I recall) along with a newly designed style in all the project templates. 

ASP.Net 4.5 also includes the ASP.NET Optimization – Bundling package which combines and minifies the CSS and JavaScript files in your Web Application.  This package is available as a Nuget Package for ASP.Net 4.0, so we can start using it today.