Testing Legacy Versions of Internet Explorer

The emulation tools in Internet Explorer’s F12 Developer tools are a godsend when you have to support older, legacy versions of IE in your solution, but sometimes you’ll run into issues where even the emulation mode isn’t close enough to the real thing.  That’s exactly what happened to me recently.  I was developing a new feature in an ASP.NET MVC application using Angular.js on the client and the page wasn’t updating after calling the server to refresh, but only in IE 9.  Weird, it worked just fine on my machine in IE 11 emulating IE 9, but I had just watched the QA engineer do the exact same thing in IE 9 and it had definitely not worked.

Luckily Microsoft has been kind enough to provide virtual machine images that can be downloaded for just this purpose on the modern.ie web site (http://dev.modern.ie/tools/vms/).  To use these virtual machines you will need to have Hyper-V, VirtualBox,  Virtual-PC, or VMWare installed.  In my case I chose to use VirtualBox, but I also have seen VMWare work with the same steps.

Steps To Configure Your Machine

In order to get your machine configured so you can run IE9 (or another version) in a virtual machine running against your local machine follow these steps.

  1. Download and install the latest version of VirtualBox from Oracle @ https://www.virtualbox.org/wiki/Downloads
  2. Download the appropriate Virtual Machine Image from modern.ie @ http://dev.modern.ie/tools/vms/
  3. Virtual Machine: [Choose the version of IE and Platform you wish to test]
  4. Platform: Select VirtualBox
  5. Click Download .zip
  6. Extract the contents of the zip and save it someplace safe.
  7. The zip should contain a file named “IE9 – Win7.ova” or something similar.
  8. Launch VirtualBox
  9. Select File Import Appliance
  10. Browse to the file you saved in step 3 (IE9 – Win7.ova) and click next
  11. Optional: I adjusted the memory from 512MB to 2GB (I would recommend this if you have the memory to spare on your host PC.)
  12. Click Import and wait…
  13. The import process took about 40 minutes on my machine…
  14. From an Elevated Command Prompt (Run as Administrator) Execute: netsh http add urlacl url=http://myhostname:2000/ user=everyone
    1. Substitute whatever your machine name is for the host name (myhostname)
    2. Substitute the port number you are using when running your application in IIS Express.
  15. Edit your IIS Express Application Configuration file (at My Documents > IIS Express > config > applicationhost.config)
  16. Find the binding for the application you would like to debug
  17. <binding protocol=”http” bindingInformation=”*:2000:localhost” />
  18. Copy this line and paste it as a new line directly underneath the existing line in the XML
  19. Change “localhost” to the name of your computer.
  20. <binding protocol=”http” bindingInformation=”*:2000:MyComputerName” />
  21. Start the application running in Visual Studio.
  22. Some of the documentation I found online suggests that you may need to run Visual Studio with elevated permissions (Run as Administrator), but that has not been my experience. I suspect I may already have whatever permission is needed on my account, your mileage may vary.
  23. Launch your virtual machine
  24. Browse to http://MyComputerName:2000/

Note: I expected to have to make a Windows Firewall rule to allow the traffic but I did not have to in order to get it working on my machine. If you have issues, that is the first place I would look. I would probably just turn off windows firewall all together and test. If that works, turn it back on and create a rule.

Note: I ran into an issue today where I needed to log in and I didn’t know/remember the password for the IEUser account on the virtual machine.  You can find that information in the Virtual Machine Instructions document.

Continuous Integration/Deployment Using GitHub, AppVeyor & Microsoft Azure Websites

There are plenty of tools available these days that a developer or development team can use to set up continuous integration/deployment.  AppVeyor is one such tool that I first heard about last spring (May 2014) when reading a post by Scott Hanselman entitled “AppVeyor – A good continuous integration system is a joy to behold“.   I thought it sounded pretty interesting and so I gave it a try.  It was so easy and simple to set up that I had builds up and running in 15 minutes and I had it deploying to my Azure Websites account in under 30 minutes!

Getting up and running is straight forward assuming you already have GitHub and Azure accounts. These aren’t hard to set up either, but for the purpose of this demo I’ll be assuming you already have one of each.  (Everyone does right?)  To demonstrate how to get things set up I have created a little demo site and checked it into GitHub.  It’s a very simple project which is basically the default ASP.NET MVC template.  I’ve stripped out a few of the endpoints, changed the text on the one remaining page and added in some unit tests that can be run as part of our build.  I’ll probably add onto this site later for other demos or just for fun, but for now this will be adequate for us to take a look at the build and deployment process using GitHub, AppVeyor and Microsoft Azure Websites.

Getting Set Up On AppVeyor

Now that we have an ASP.NET project on GitHub we can get started setting up AppVeyor to build our project.  The first step is to set up our account.  At the time of this writing there is a big green button labeled “SIGN UP FOR FREE” right on the home page.  Click that button, select a plan (I’m choosing the “Free – for open-source projects” option), and choose log in with GitHub.  You can also select BitBucket or Visual Studio Online if you would like to use one of those services instead.  I have not tried them, but I would assume they work exactly the same.

AppVeyor Sign Up Screen

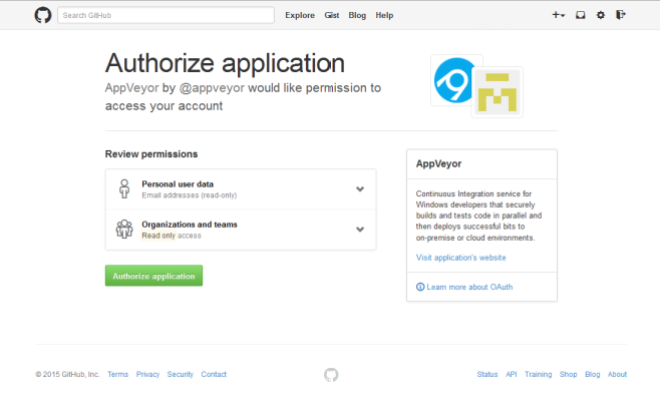
Once you log into GitHub you will be presented with an authorization screen from GitHub.com asking you to confirm that you would like to authorize AppVeyor to access your account.  Click “Authorize application” to authorize AppVeyor and continue with set up.

GitHub Authorization ScreenNext you’ll see the project screen which will be empty at this time except for large item that says “+ NEW PROJECT”.  Click this link to add a new project to your account.   This will take you to a page to select the source control repository you would like to pull from.  The page will default to GitHub and after a few seconds your GitHub Repositories will appear.  If you now hover over the repository you would like to add a button will appear to the right so that you can add the repository.  Click the add button.

Select Repository GitHub - Add

Your First Build

At this point you should have things configured enough to build your repository.  Simply click the “New Build” button on the right to start a build!

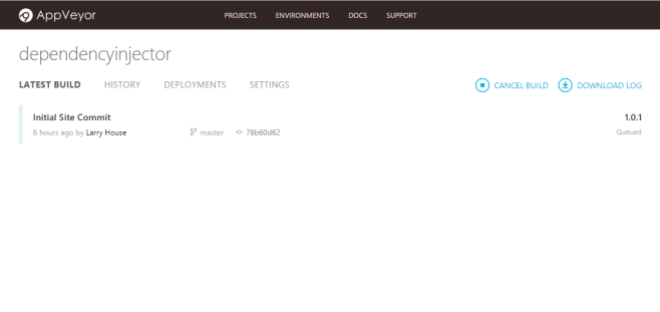
Build QueuedNotice that the build is now queued up, the site has pulled in the commit message, time and author and it has automatically incremented our version number to version 1.0.1.  We can manipulate these version numbers in the settings if we wish as well allowing us to make it version 2.0, 2.1, etc.  The server will simply keep incrementing the build number.

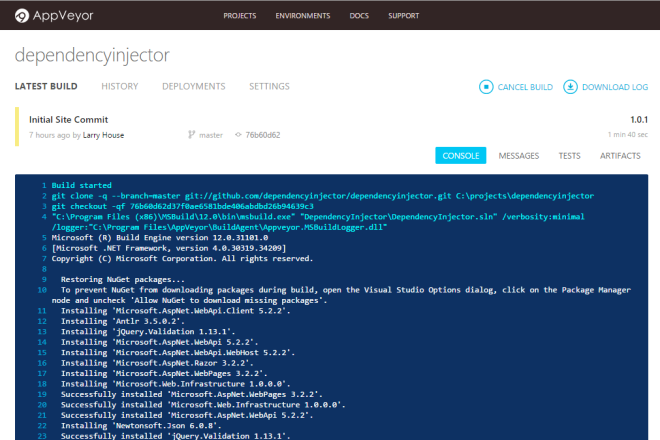
Once the build actually begins we will be able to view the console output.

Build Console Output

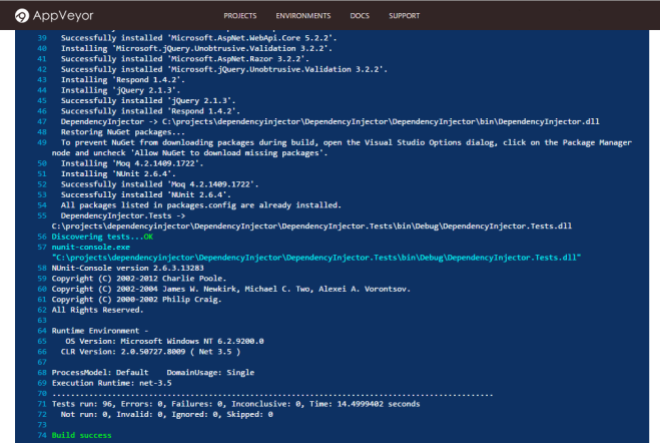
And once it completes we will get a success or failure message.

Build Success

Notice the green “Build Success” message.  We now have everything configured and any time we commit on the master branch a build will be triggered.  We can customize the branches that build etc. in the settings which I will dig into in a later post.

Also note here that the server has automatically detected and run our unit tests!  Had any of our tests failed the server would have failed the build as well.

Setting Up Azure Websites

The first thing we will need to do in order to deploy our site to Azure is create the site in Azure.  If you already have done this or your site is already live on Azure go ahead and skip ahead to the next step – Configuring Deployment.

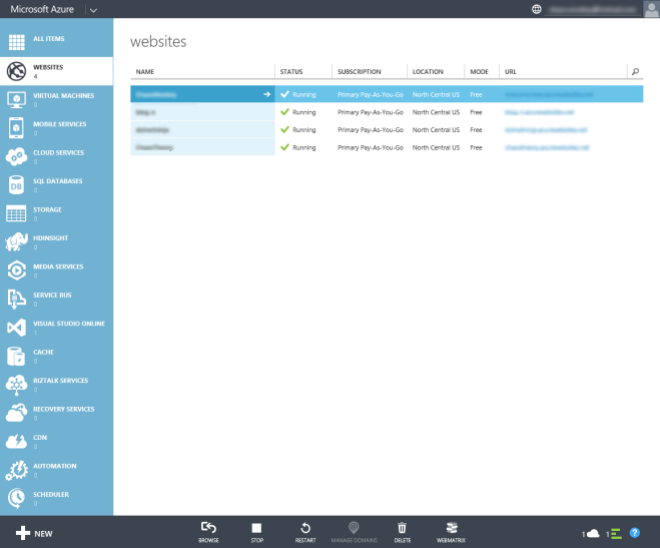
Start off by going to the Microsoft Azure Portal (https://manage.windowsazure.com/) and once you are logged in click the “WEBSITES” link on the left side bar and then click the New button in the lower left corner.

Portal Websites

A panel will appear at the bottom of the screen.  Select “COMPUTE”, “WEBSITE” & “CUSTOM CREATE”.

New Compute Website Custom Create

Enter a URL for your website and click the check mark button.

Custom Create Dialog

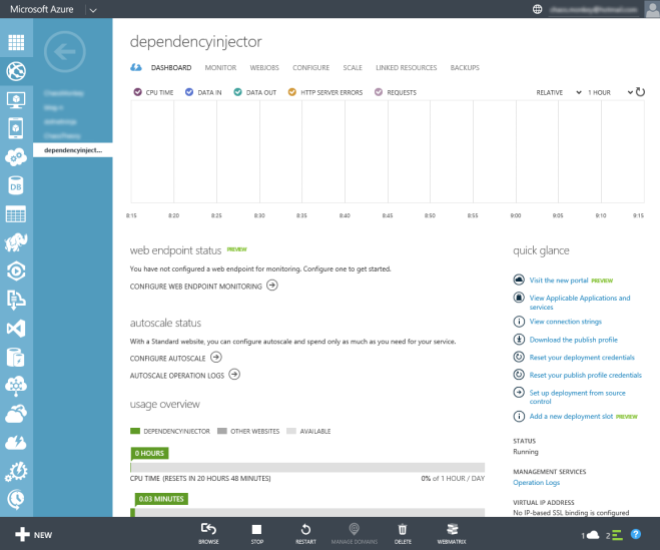
After a little churning your site will be created.  While we are here there is a little piece of information we will need later, so let’s get that now.  Click on your new site in the websites list to view the details.

Website details

Now click the “Download the publish profile” link on the right side of the page and save it off to your local disc for later use.

Configuring Deployment

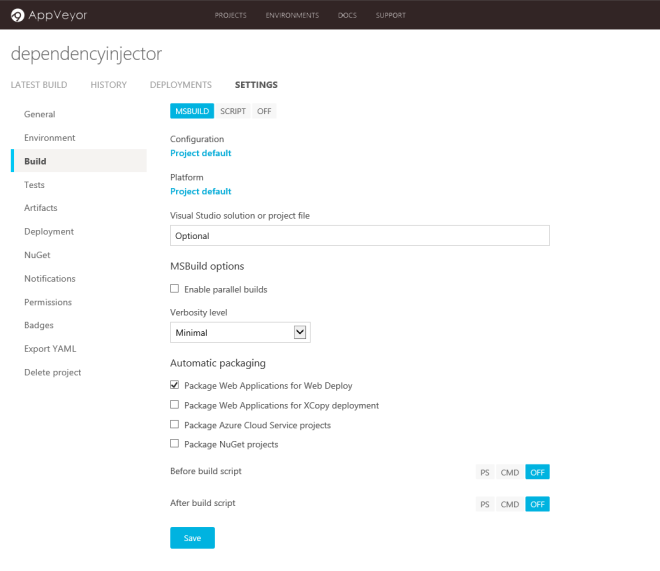
To configure your deployment go back to AppVeyor, select your project, click settings and then when the settings page loads go to the build section (third item down the left side).  You’ll need to be sure the option “Package Web Application for Web Deploy” is checked and then save your changes.

Build Settings - Package for MS Deploy

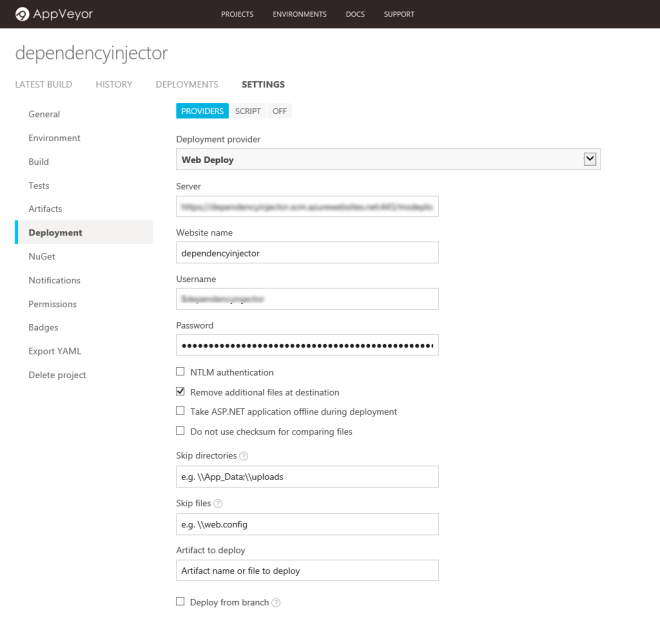
Next go down to the Deployment section (three more items down).  First click “Add Deployment” to add your first deployment and get started configuring it.  You’ll need to select the “Web Deploy” deployment provider.  This is where we need the info in the publish settings file we saved earlier.  Specifically we need the settings publishUrl,  msdeploysite, username, and userPWD.  These values go into the fields in the deployment section as follows:

Server = https: //[publishUrl]/msdeploy.axd?site=[msdeploySite]
Website Name = [msdeploySite]
Username = [username]
Password = [userPWD]

You will also want to turn off NTLM.

Deployment Settings

Click the “Save” button and we should be ready to give it a try.  To start a new build click “LATEST BUILD” and then “NEW BUILD”.  Assuming we’ve done everything correctly a build of your project will queue up and if it is successful it should deploy to you site on Microsoft Azure.

The site is at: http://dependencyinjector.azurewebsites.net/
The GitHub Repository is at: https://github.com/dependencyinjector/dependencyinjector
The AppVeyor Build Information is at: https://ci.appveyor.com/project/lahouse/dependencyinjector

Resources

Documentation:
http://www.appveyor.com/docs/deployment/web-deploy#provider-settings

Scott Hanselman’s Blog Post: http://www.hanselman.com/blog/AppVeyorAGoodContinuousIntegrationSystemIsAJoyToBehold.aspx

ASP.NET 5 / ASP.NET vNext – Resources

ASP.NET 5 is a major rethinking of .NET on the server.  It’s cross platform (it can be run on Linux or Mac as well as Windows), cloud ready, modular,  has a unified MVC / Web API / Web Pages programming model, allows you to self host your application or to host in IIS in the traditional manner, and of course it’s open source (Apache 2.0) on GitHub.  It’s a lean, mean modern web development stack that will run anywhere.

Getting Started

The best way to get started is to head over to www.asp.net/vnext and start digging in.  There’s tons of content to help wrap your head around the new world and to get you going in the right direction, and while you’re there you download the CTP of Visual Studio 2015 as well or you can grab it off of Visual Studio.com.

The Weekly Community Stand Up

The team is hosting a weekly community standup where they discuss what is new and where they are headed.  Each stand up is about 20 to 30 minutes long and packed with loads of information about what is coming and what the thought process is behind the decisions the team is making.

Channel 9 Videos

Channel 9 has a nice little series of videos on ASP.NET 5 that are hosted by Scott Hanselman  and various team members including Rowan Miller from the Entity Framework team.  (Check out Scott’s Blog too.  He has a posted a few articles on ASP.NET 5 / vNext)

What’s New with ASP.NET 5: (01) ASP.NET 5 What and Why

What’s New with ASP.NET 5: (02) ASP.NET MVC + Web API Part 1

What’s New with ASP.NET 5: (03) ASP.NET MVC + Web API Part 2

What’s New with ASP.NET 5: (04) Visual Studio Tooling for ASP.NET 5

What’s New with ASP.NET 5: (05) ASP.NET 5 Internals Deep Dive

What’s New with ASP.NET 5: (06) Entity Framework 7

And this video on the Open Sourcing of the .NET Framework.

Immo Landwerth and David Kean – Open sourcing the .NET Framework

.NET Blog

You might also want to keep an eye on the .NET Framework Blog for all the latest news.

Setting Up Dependency Injection in ASP.NET MVC with AutoFac

There are lots of IOC (Inversion of Control) containers out there that you can use to do dependency injection in your ASP.NET MVC project.  Honestly, most of them are pretty good, and having chosen to use one is really far more important than which one in most cases.  Having said that, there can be some significant differences in performance and features.  I typically use Autofac because it is one of the fastest and it can reliably and automatically call Dispose() on the IDisposables that it creates in a per http request scope.

Adding Autofac To Your Project

Thanks to the magic of NuGet, you can quickly and painlessly add Autofac to your solution and get started.  In my example here I’ll be adding Autofac support to an ASP.NET MVC 5.2 web application with Web API 2.2.  To do that I’ll need to add 2 packages to my project, Autofac ASP.NET MVC 5 Integration (Id: Autofac.Mvc5 / Version: 3.3.3) and Autofac ASP.NET Web API 2.2 Integration (Id: Autofac.WebApi2 / Version: 3.4.0) .  Adding those packages will add the dependent package Autofac (Id: Autofac / Version 3.5.0), which is the actual core Autofac assembly.  Once completed I have the following packages installed:

ASP.NET MVC AutoFac NuGet Packages

Configuring The Container

Now that we have the packages installed we will need to configure our IOC container and register it with the system.  In keeping with the pattern already in place for handling start up application configuration in ASP.NET MVC, I add a DependencyConfig class to the App_Start folder of my MVC project.  This is a static class that has only a single public method named RegisterDependencyResolvers() and two private methods.

public static IContainer RegisterDependencyResolvers()
{
    ContainerBuilder builder = new ContainerBuilder();
    RegisterDependencyMappingDefaults(builder);
    RegisterDependencyMappingOverrides(builder);
    IContainer container = builder.Build();
    // Set Up MVC Dependency Resolver
    DependencyResolver.SetResolver(new AutofacDependencyResolver(container));
    // Set Up WebAPI Resolver
    GlobalConfiguration.Configuration.DependencyResolver= new AutofacWebApiDependencyResolver(container);
    return container;
}

In the above code snippet line 3 creates a container builder that we will use to configure and create our IOC container.  Lines 4 and 5 call our private methods to configure the type mappings our container will use, we’ll circle back to that in just a minute here.  Line 6 actually creates our Autofac container and line 8 registers a new AutofacDependencyResolver (using our container) as the dependency resolver for ASP.NET MVC.  That means that not only have we set up a dependency resolver for services that we need in our code, but also for the services that ASP.NET MVC will need as well.  For example when ASP.NET needs to create an instance of a controller to handle requests to our site, it will use the container we just created to create an instance of that controller (and all of it’s dependencies).  Line 10 does the same thing as line 8, but this time it is registering a dependency resolver with the WebAPI engine.  Finally line 11 returns an instance of the container we created.  I sometimes use this for unit testing that the dependency mappings have been set up correctly.

Registering Types With The Container

In order for the Autofac container to resolve the dependencies we need we’ll need to tell it what to use for the implementation of the service interfaces our items require.  This is not the only way to do this, but it is the way I prefer and it seems to work out pretty well.  In the first method below we are going to create some global registrations to put in place some general rules so we don’t have to explicitly specify the type for every single thing we need.

private static void RegisterDependencyMappingDefaults(ContainerBuilder builder)
{
    Assembly coreAssembly = Assembly.GetAssembly(typeof (IStateManager));
    Assembly webAssembly = Assembly.GetAssembly(typeof (MvcApplication));
    builder.RegisterAssemblyTypes(coreAssembly).AsImplementedInterfaces().InstancePerRequest();
    builder.RegisterAssemblyTypes(webAssembly).AsImplementedInterfaces().InstancePerRequest();

    builder.RegisterControllers(webAssembly);
    builder.RegisterModule(new AutofacWebTypesModule());
}

On lines 3 & 4 I am getting a reference to the assemblies that contain types I want to register in my solution.  In this case I have a core assembly that contains my models and logic and a web assembly which contains my web UI (Controllers, Views, etc…).  Lines 5 & 6 register every type in the assembly as the implementation for any interface they implement.  Let’s assume that I have a class Foo that implements the IBar interface in one of these assemblies.  With this registration I have registered Foo as the implementation of IBar and if I ask the container to resolve an IBar it will give me an instance of Foo.  It also means that if I ask the container to resolve an item that requires an IBar as a constructor parameter that it will create a Foo and pass it into the constructor of the type I am asking for.   The last part of these two lines defines the lifetime or scope of the objects created.  In this case we are specifying InstancePerRequest.  That means that the container will create one instance of any given type per http request and use it to fulfill any requests for that type.  At the end of the request any objects created will be destroyed.  There are a number of scopes you can choose.  InstancePerRequest and SingleInstance are the two I use the most.  See the docs for more details.

Line 8 registers the MVC Controllers in the web assembly so that ASP.NET can use our resolver to resolve them.  Line 9 then registers an Autofac Module with the container that allows the container to resolve certain web types (like HttpContextBase) so that they can be injected into our classes. (This makes it much simpler to mock & unit test our classes that depend on these web types!)

Now that we have our global registration in place we will probably want to be specific in a few cases.  For example, if you have more than one implementation of a given interface you may want to be specific about which one to use (FYI: last one registered wins…), or you may want certain objects to be create in a different scope as I have done below.

private static void RegisterDependencyMappingOverrides(ContainerBuilder builder)
{
    builder.RegisterType<WebSettingManager>().AsImplementedInterfaces().SingleInstance();
}

In this case I have registered the WebSettingManager class as the implementation of it’s interface(s) and set it to use a SingleInstance scope effectively making it a singleton that lives across http requests.

Final Set Up – The Global.Asax

The last thing you will need to do is actually invoke the RegisterDependencyResolvers method during application start up so that everything gets hooked up properly.

In your global.asax file in Application_Start you will need to add one line of code.

DependencyConfig.RegisterDependencyResolvers()

Here is the entire DependencyConfig.cs

public static class DependencyConfig
{
    public static IContainer RegisterDependencyResolvers()
    {
        ContainerBuilder builder = new ContainerBuilder();
        RegisterDependencyMappingDefaults(builder);
        RegisterDependencyMappingOverrides(builder);
        IContainer container = builder.Build();
        // Set Up MVC Dependency Resolver
        DependencyResolver.SetResolver(new AutofacDependencyResolver(container));
        // Set Up WebAPI Resolver
        GlobalConfiguration.Configuration.DependencyResolver=new AutofacWebApiDependencyResolver(container);
        return container;
    }

    private static void RegisterDependencyMappingDefaults(ContainerBuilder builder)
    {
        Assembly coreAssembly = Assembly.GetAssembly(typeof (IStateManager));
        Assembly webAssembly = Assembly.GetAssembly(typeof (MvcApplication));

        builder.RegisterAssemblyTypes(coreAssembly).AsImplementedInterfaces().InstancePerRequest();
        builder.RegisterAssemblyTypes(webAssembly).AsImplementedInterfaces().InstancePerRequest();

        builder.RegisterControllers(webAssembly);
        builder.RegisterModule(new AutofacWebTypesModule());
    }

    private static void RegisterDependencyMappingOverrides(ContainerBuilder builder)
    {        
        builder.RegisterType<WebSettingManager>AutofacDependencyResolver()
                  .AsImplementedInterfaces().SingleInstance();
    }
}

Resources

Project Home Page: http://autofac.org/

Project Documentation: http://autofac.readthedocs.org/en/latest/#

Project Source Code: https://github.com/autofac/Autofac

NuGet Packages: http://www.nuget.org/packages?q=autofac