Month: October 2011

The communication object, System.ServiceModel.Channels.ServiceChannel, cannot be used for communication because it is in the Faulted state.

Today was the first time I have worked on our Azure application in quite a while, so I was unpleasantly surprised when I got the latest version of the code, clicked run and was greeted with :

The communication object, System.ServiceModel.Channels.ServiceChannel, cannot be used for communication because it is in the Faulted state.

CommunicationObjectFaultedException

After a lot of poking around and reinstalling the SDK I finally found the solution.  Apparently when running an application under Azure SDK version 1.3 the development environment needs to modify the web config in some way.  However, since I am using TFS for source control, the file was marked readonly and could not be edited.

The work around seemed pretty simple, just remove the readonly flag and off we go.  The next problem is that every time you get latest from source control the file gets marked readonly again and now it won’t run. 🙁  To get around this just add a post-build command to your project to automatically remove the readonly flag when you run your project.   To do this right-click on your project in the Solution Explorer and select properties.  Go to the Build Events tab and enter the command : attrib -r “$(ProjectDir)Web.Config” .

attrib -r "$(ProjectDir)Web.Config"

Windows Developer Preview–Keyboard Shortcuts

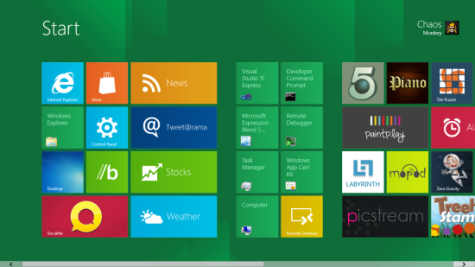
After Installing Windows 8 Developer Preview in a Virtual Machine or on older hardware, you will immediately find that the interface is a bit clunky without touch of any kind.  Hopefully the following list of keyboard shortcuts will help to alleviate the pain.

  • The Windows Key takes you back to the Start Screen.
  • Alt + Tab brings up the application switcher.
  • Windows Keys + Tab cycles through the running applications.
  • Windows Key + C or hovering over the bottom left corner of the screen with your mouse brings up the Charms Menu.
  • Windows Key + F opens the search screen (or you can just start typing on the Start Screen).
  • Windows Key + Z brings up the application bars.
  • Windows Key + D takes you to your desktop.
  • Windows Key + L Locks the system (as usual).
  • Windows Key + I brings up the Settings.
  • Windows Key + E opens Windows Explorer on your desktop.
  • Windows Key + R takes you to your desktop and opens the Run Prompt.
  • CTRL-ALT-DEL brings up a screen to log off, shut down, switch users, etc.
  • Right clicking a Tile on the Start Screen brings up options (Unpin, changes size, etc.)
  • Right Clicking in a Metro app brings up the application bars.
  • The mouse scroll wheel pans through the items on your Start Screen, although it seems a bit buggy on my VM.

Run Windows Developer Preview in VMware Player 4.0

Shortly after build I attempted  to install Windows Developer Preview in a Virtual Machine running on VMware Player without much success.  After playing with it for a while I finally gave up and moved on.  However, over the weekend, I realized that VMware had released VMware Player 4.0.  After downloading and installing the new player I was able to install the Windows Developer Preview in VMware Player with out any issues.

The process was fairly simple and straight forward, just make sure to download the ISO before you start.

  1. Select Create a New Virtual Machine from the Welcome to VMware Player Panel on the start up screen.
  2. Select the option “I will install the operating system later.”
  3. Select the Option for Microsoft Windows and then select Windows 7 x64 from the drop down.
  4. Give your VM a name and choose the location to save the files.
  5. I then selected to create an 80GB Virtual Disk.  (The Build PC has a 64 GB SSD, I figured a little extra space couldn’t hurt! Smile)
  6. On the next screen I choose Customize Hardware.
  7. I set the Memory to use 2GB (I only have 4GB in my desktop).
  8. I set the Processors to 2 Cores (I have 4 Cores).
  9. I set the CD/DVD to “Use ISO Image file: “. and browsed to the ISO image.
  10. Then click close to exit the customize hardware dialog and Finish to create your new VM.
  11. Now just boot the VM and let the installation begin.  (Note: you will want to use the custom install option when the installer asks)